lost and found ( for me ? )

DNS Unbound

BINDの代替と言われているUnbound。

BINDに比べ、パフォーマンス、セキュリティで優れているらしい。
昨年はカミンスキー氏のポイズニング手法が発表されたこともあり、
セキュリティ面について、Unboundがどんなかんじなのかさわってみました。

すべてのオプションをチェックしたわけじゃないけど、
BINDよりセキュリティは優れていそうな感じ。

スプーフィングパケットを xx 個受けとると、自動でキャッシュをクリア
する機能がある。

unbound.conf の下記のオプション。

unwanted-reply-threshold: 1000

で、実際にテストしてみると、おー、すごい、シスログに下記の
メッセージを出して、キャッシュを自動でクリアした~。

unbound: [17643:0] warning: unwanted reply total reached threshold (1000) you may be under attack. defensive action: clearing the cache

他に、権威サーバに問い合わせるときに、大文字と小文字を混ぜるオプション
があるなー。

# Use 0x20-encoded random bits in the query to foil spoof attempts.
# This feature is an experimental implementation of draft dns-0x20.

use-caps-for-id: yes

で、dig( ファミコンでディグダグってやつあったなー) 、
してみると。

# dig @127.1 www.google.com.

おー、大文字と小文字混ぜてる。

# tshark -i eth0 port 53
unboundのIP -> 権威サーバのIP DNS Standard query A WwW.googLe.COm

カミンスキー攻撃の対策として、ソースポートのランダム化が有効らしいけど、
DNSプロトコルの実装上、ランダム化してもポイズニングされる確率が
減っただけで、ポイズニングされる確率がゼロになったわけではないらしい。

unbound だと、ソースポートのランダム化に加え、スプーフィングパケット
の検知・キャッシュクリア、大文字・小文字の混ぜ合わせとかあって、BINDより
セキュリティ強そうだな。
なかなかポイズニングされないのでは。。。と思う。

unwanted-reply-threshold 有効にしてれば、ログに出してくれるので、
ポイズニングが成功する前に、攻撃受けてるって気付きそうだし。

しかも統計情報に unwanted-replies って項目があって、スプーフィングパケット
をカウントしてる。すげ~。

# unbound-control stats

unwanted.replies=6605 <- これ

ナイスじゃないですか~。

統計情報もBINDより充実してるな~。
レスポンス時間のヒストグラムまである。。
これまたナイスじゃないですか~。

# unbound-control stats
thread0.num.queries=340
thread0.num.cachehits=11
thread0.num.cachemiss=329
thread0.num.recursivereplies=329
thread0.requestlist.avg=0.0273556
thread0.requestlist.max=8
thread0.requestlist.overwritten=0
thread0.requestlist.exceeded=0
thread0.requestlist.current.all=0
thread0.requestlist.current.user=0
thread0.recursion.time.avg=0.132001
thread0.recursion.time.median=0.0346645
total.num.queries=340
total.num.cachehits=11
total.num.cachemiss=329
total.num.recursivereplies=329
total.requestlist.avg=0.0273556
total.requestlist.max=8
total.requestlist.overwritten=0
total.requestlist.exceeded=0
total.requestlist.current.all=0
total.requestlist.current.user=0
total.recursion.time.avg=0.132001
total.recursion.time.median=0.0346645
time.now=1241025277.288877
time.up=935.553378
time.elapsed=23.144044
mem.total.sbrk=5410816
mem.cache.rrset=53020
mem.cache.message=102174
mem.mod.iterator=24664
mem.mod.validator=41392
histogram.000000.000000.to.000000.000001=0
histogram.000000.000001.to.000000.000002=0
histogram.000000.000002.to.000000.000004=0
histogram.000000.000004.to.000000.000008=0
histogram.000000.000008.to.000000.000016=0
histogram.000000.000016.to.000000.000032=0
histogram.000000.000032.to.000000.000064=0
histogram.000000.000064.to.000000.000128=0
histogram.000000.000128.to.000000.000256=0
histogram.000000.000256.to.000000.000512=0
histogram.000000.000512.to.000000.001024=0
histogram.000000.001024.to.000000.002048=0
histogram.000000.002048.to.000000.004096=0
histogram.000000.004096.to.000000.008192=0
histogram.000000.008192.to.000000.016384=0
histogram.000000.016384.to.000000.032768=0
histogram.000000.032768.to.000000.065536=0
histogram.000000.065536.to.000000.131072=311
histogram.000000.131072.to.000000.262144=13
histogram.000000.262144.to.000000.524288=4
histogram.000000.524288.to.000001.000000=1
histogram.000001.000000.to.000002.000000=0
histogram.000002.000000.to.000004.000000=0
histogram.000004.000000.to.000008.000000=0
histogram.000008.000000.to.000016.000000=0
histogram.000016.000000.to.000032.000000=0
histogram.000032.000000.to.000064.000000=0
histogram.000064.000000.to.000128.000000=0
histogram.000128.000000.to.000256.000000=0
histogram.000256.000000.to.000512.000000=0
histogram.000512.000000.to.001024.000000=0
histogram.001024.000000.to.002048.000000=0
histogram.002048.000000.to.004096.000000=0
histogram.004096.000000.to.008192.000000=0
histogram.008192.000000.to.016384.000000=0
histogram.016384.000000.to.032768.000000=0
histogram.032768.000000.to.065536.000000=0
histogram.065536.000000.to.131072.000000=0
histogram.131072.000000.to.262144.000000=0
histogram.262144.000000.to.524288.000000=0
num.query.type.A=340
num.query.class.IN=340
num.query.opcode.QUERY=340
num.query.tcp=0
num.query.ipv6=0
num.query.flags.QR=0
num.query.flags.AA=0
num.query.flags.TC=0
num.query.flags.RD=338
num.query.flags.RA=0
num.query.flags.Z=0
num.query.flags.AD=0
num.query.flags.CD=0
num.query.edns.present=0
num.query.edns.DO=0
num.answer.rcode.NOERROR=11
num.answer.rcode.NXDOMAIN=327
num.answer.rcode.REFUSED=2
num.answer.secure=0
num.answer.bogus=0
num.rrset.bogus=0
unwanted.queries=0
unwanted.replies=12198

ってことで、おもしろそうなので、もうちょいさわってみよう。

apt-get その2

Ubuntu CLIからのアップデート方法

yum update = apt-get update して、そのあと apt-get upgrade

apt-get update でアップデートの情報を取得し、その情報をもとに
apt-get upgrade でパッケージのアップグレードを行う。

いきなり apt-get upgrade をしても、アップグレードするものがないって
言われる。

いきなり upgrade 。アップグレード 0 個って表示される。

root@alaska:~# apt-get upgrade
パッケージリストを読み込んでいます... 完了
依存関係ツリーを作成しています
状態情報を読み取っています... 完了
アップグレード: 0 個、新規インストール: 0 個、削除: 0 個、保留: 0 個

でも、update したあとに upgrade すると、アップデート情報を取得、
アップグレードされる。

root@alaska:~# apt-get update
ヒット http://jp.archive.ubuntu.com jaunty Release.gpg
ヒット http://jp.archive.ubuntu.com jaunty/main Translation-ja
ヒット http://jp.archive.ubuntu.com jaunty/restricted Translation-ja
ヒット http://jp.archive.ubuntu.com jaunty/universe Translation-ja
ヒット http://jp.archive.ubuntu.com jaunty/multiverse Translation-ja
取得:1 http://jp.archive.ubuntu.com jaunty-updates Release.gpg [189B]
無視 http://jp.archive.ubuntu.com jaunty-updates/main Translation-ja
無視 http://jp.archive.ubuntu.com jaunty-updates/restricted Translation-ja
無視 http://jp.archive.ubuntu.com jaunty-updates/universe Translation-ja
無視 http://jp.archive.ubuntu.com jaunty-updates/multiverse Translation-ja
ヒット http://jp.archive.ubuntu.com jaunty Release
取得:2 http://jp.archive.ubuntu.com jaunty-updates Release [49.6kB]
ヒット http://jp.archive.ubuntu.com jaunty/main Packages
ヒット http://jp.archive.ubuntu.com jaunty/restricted Packages
ヒット http://jp.archive.ubuntu.com jaunty/main Sources
ヒット http://jp.archive.ubuntu.com jaunty/restricted Sources
ヒット http://jp.archive.ubuntu.com jaunty/universe Packages
ヒット http://jp.archive.ubuntu.com jaunty/universe Sources
ヒット http://jp.archive.ubuntu.com jaunty/multiverse Packages
ヒット http://jp.archive.ubuntu.com jaunty/multiverse Sources
取得:3 http://jp.archive.ubuntu.com jaunty-updates/main Packages [14.5kB]
取得:4 http://jp.archive.ubuntu.com jaunty-updates/restricted Packages [14B]
取得:5 http://jp.archive.ubuntu.com jaunty-updates/main Sources [4149B]
取得:6 http://security.ubuntu.com jaunty-security Release.gpg [189B]
無視 http://security.ubuntu.com jaunty-security/main Translation-ja
取得:7 http://jp.archive.ubuntu.com jaunty-updates/restricted Sources [14B]
取得:8 http://jp.archive.ubuntu.com jaunty-updates/universe Packages [5423B]
取得:9 http://jp.archive.ubuntu.com jaunty-updates/universe Sources [14B]
取得:10 http://jp.archive.ubuntu.com jaunty-updates/multiverse Packages [14B]
取得:11 http://jp.archive.ubuntu.com jaunty-updates/multiverse Sources [14B]
無視 http://security.ubuntu.com jaunty-security/restricted Translation-ja
無視 http://security.ubuntu.com jaunty-security/universe Translation-ja
無視 http://security.ubuntu.com jaunty-security/multiverse Translation-ja
取得:12 http://security.ubuntu.com jaunty-security Release [49.6kB]
取得:13 http://security.ubuntu.com jaunty-security/main Packages [11.6kB]
取得:14 http://security.ubuntu.com jaunty-security/restricted Packages [14B]
取得:15 http://security.ubuntu.com jaunty-security/main Sources [3370B]
取得:16 http://security.ubuntu.com jaunty-security/restricted Sources [14B]
取得:17 http://security.ubuntu.com jaunty-security/universe Packages [4143B]
取得:18 http://security.ubuntu.com jaunty-security/universe Sources [14B]
取得:19 http://security.ubuntu.com jaunty-security/multiverse Packages [14B]
取得:20 http://security.ubuntu.com jaunty-security/multiverse Sources [14B]
143kB を 2s で取得しました (71.2kB/s)
パッケージリストを読み込んでいます... 完了
root@alaska:~# apt-get upgrade
パッケージリストを読み込んでいます... 完了
依存関係ツリーを作成しています
状態情報を読み取っています... 完了
以下のパッケージはアップグレードされます:
  acpid libfreetype6 update-manager update-manager-core
アップグレード: 4 個、新規インストール: 0 個、削除: 0 個、保留: 0 個。
1369kB のアーカイブを取得する必要があります。
この操作後に追加で 8192B のディスク容量が消費されます。
続行しますか [Y/n]? y
取得:1 http://jp.archive.ubuntu.com jaunty-updates/main update-manager 1:0.111.8 [773kB]
取得:2 http://jp.archive.ubuntu.com jaunty-updates/main update-manager-core 1:0.111.8 [171kB]
取得:3 http://jp.archive.ubuntu.com jaunty-updates/main acpid 1.0.6-9ubuntu4.9.04.2 [33.3kB]
取得:4 http://jp.archive.ubuntu.com jaunty-updates/main libfreetype6 2.3.9-4ubuntu0.1 [392kB]
1369kB を 1s で取得しました (850kB/s)
(データベースを読み込んでいます ... 現在 103045 個のファイルとディレクトリがインストールされています。)
update-manager 1:0.111.7 を (.../update-manager_1%3a0.111.8_all.deb で) 置換するための準備をしています ...
update-manager を展開し、置換しています...
update-manager-core 1:0.111.7 を (.../update-manager-core_1%3a0.111.8_i386.deb で) 置換す るための準備をしています ...
update-manager-core を展開し、置換しています...
acpid 1.0.6-9ubuntu4 を (.../acpid_1.0.6-9ubuntu4.9.04.2_i386.deb で) 置換するための準備をしています ...
 * Stopping ACPI services...                                                       [ OK ]
acpid を展開し、置換しています...
libfreetype6 2.3.9-4build1 を (.../libfreetype6_2.3.9-4ubuntu0.1_i386.deb で) 置換するための準備をしています ...
libfreetype6 を展開し、置換しています...
man-db のトリガを処理しています ...
update-manager-core (1:0.111.8) を設定しています ...

update-manager (1:0.111.8) を設定しています ...

acpid (1.0.6-9ubuntu4.9.04.2) を設定しています ...
 * Stopping Hardware abstraction layer hald                                        [ OK ]
 * Loading ACPI modules...                                                         [ OK ]
 * Starting ACPI services...                                                       [ OK ]
 * Starting Hardware abstraction layer hald                                        [ OK ]

libfreetype6 (2.3.9-4ubuntu0.1) を設定しています ...

libc6 のトリガを処理しています ...
ldconfig deferred processing now taking place
root@alaska:~#

apt-get コマンドの使い方と apt-get で unbound のインストール

apt-get コマンドの使い方と apt-get で unbound のインストール。

普段は、Red Hat系OS(Fedora,Cent OS)を使っていて、apt-get コマンドは不慣れなのでメモ。

yum update = apt-get upgrade
yum list = apt-get update して apt-cache pkgnames または apt-cache search 文字列
yum install パッケージ名 = apt-get install パッケージ名
yum remove パッケージ名 = apt-get remove パッケージ名

DNS(キャッシュサーバ)、unboundをインストール

# apt-get update
ヒット http://jp.archive.ubuntu.com jaunty Release.gpg


# apt-cache search unbound
cl-plus - Common Lisp extensions for building some Debian CL packages
libocamlbricks-ocaml-dev - Miscellaneous utility functions in OCaml for Marionnet
libunbound-dev - static library, header files, and docs for libunbound
libunbound0 - library implementing DNS resolution and validation
python-gmpy - Interfaces GMP to Python for fast, unbound-precision computations
python-qwt4 - Python version of the Qwt technical widget library
python-qwt4-doc - Documentation for the Python-qwt library
python-qwt5-doc - Python version of the Qwt5 technical widget library
python-qwt5-qt3 - Python version of the Qwt5 technical widget library
python-qwt5-qt4 - Python version of the Qwt5 technical widget library
sword-text-tagalog - Tagalog translation of James and John Bible texts
unbound - validating, recursive, caching DNS resolver
unbound-host - reimplementation of the 'host' command

# apt-cache pkgnames | grep unbound
libunbound-dev
unbound
libunbound0
unbound-host

# apt-get install unbound
パッケージリストを読み込んでいます... 完了
依存関係ツリーを作成しています
状態情報を読み取っています... 完了
以下の特別パッケージがインストールされます:
libldns1
以下のパッケージが新たにインストールされます:
libldns1 unbound
アップグレード: 0 個、新規インストール: 2 個、削除: 0 個、保留: 0 個。
711kB のアーカイブを取得する必要があります。
この操作後に追加で 1712kB のディスク容量が消費されます。
続行しますか [Y/n]? y
取得:1 http://jp.archive.ubuntu.com jaunty/universe libldns1 1.4.0-1 [114kB]
取得:2 http://jp.archive.ubuntu.com jaunty/universe unbound 1.2.1-0ubuntu1 [597kB]
711kB を 0s で取得しました (725kB/s)
未選択パッケージ libldns1 を選択しています。
(データベースを読み込んでいます ... 現在 103020 個のファイルとディレクトリがインストールされています。)
(.../libldns1_1.4.0-1_i386.deb から) libldns1 を展開しています...
未選択パッケージ unbound を選択しています。
(.../unbound_1.2.1-0ubuntu1_i386.deb から) unbound を展開しています...
man-db のトリガを処理しています ...
libldns1 (1.4.0-1) を設定しています ...

unbound (1.2.1-0ubuntu1) を設定しています ...
* Starting recursive DNS server unbound [ OK ]

libc6 のトリガを処理しています ...
ldconfig deferred processing now taking place
# # apt-cache show unbound
Package: unbound
Priority: optional
Section: universe/net
Installed-Size: 1376
Maintainer: Ubuntu MOTU Developers
Original-Maintainer: Robert S. Edmonds
Architecture: i386
Version: 1.2.1-0ubuntu1
Depends: libc6 (>= 2.4), libldns1, libssl0.9.8 (>= 0.9.8f-5), adduser
Filename: pool/universe/u/unbound/unbound_1.2.1-0ubuntu1_i386.deb
Size: 597346
MD5sum: 2141d09b9741866c8cf8a62690b700b9
SHA1: 4c2f2eb8f871896ad182877ef2caf11704265cc2
SHA256: 1122230e17f92cc7470e290853d5d74f47d2b580c0dadd3e6f701a647045321c
Description: validating, recursive, caching DNS resolver
Unbound is a recursive-only caching DNS server which can optionally
perform DNSSEC validation of results. It implements only a minimum amount
of authoritative service to prevent leakage to the root nameservers:
forward lookups for localhost, reverse for 127.0.0.1 and ::1, and
NXDOMAIN for zones served by AS112. Stub and forward zones are supported.
.
Unbound implements a number of security features, including chrooting and
privilege dropping. The Debian init script will populate a chroot by default.
.
This package contains the unbound daemon.
Homepage: http://www.unbound.net/
Bugs: https://bugs.launchpad.net/ubuntu/+filebug
Origin: Ubuntu

#

# lsof -i:53
COMMAND PID USER FD TYPE DEVICE SIZE NODE NAME
unbound 11484 unbound 3u IPv4 56525 UDP localhost:domain
unbound 11484 unbound 4u IPv4 56527 TCP localhost:domain (LISTEN)
root@alaska:~/.vnc# dig @127.1 www.google.com

; <<>> DiG 9.5.1-P2 <<>> @127.1 www.google.com
; (1 server found)
;; global options: printcmd
;; Got answer:
;; ->>HEADER<<- opcode: QUERY, status: NOERROR, id: 8420
;; flags: qr rd ra; QUERY: 1, ANSWER: 4, AUTHORITY: 0, ADDITIONAL: 0

;; QUESTION SECTION:
;www.google.com. IN A

;; ANSWER SECTION:
www.google.com. 604784 IN CNAME www.l.google.com.
www.l.google.com. 284 IN A 66.249.89.99
www.l.google.com. 284 IN A 66.249.89.147
www.l.google.com. 284 IN A 66.249.89.104

# unbound-control status
[1240766356] unbound-control[11528:0] warning: control-enable is 'no' in the config file.
error: Error setting up SSL_CTX client key and cert
11528:error:02001002:system library:fopen:No such file or directory:bss_file.c:352:fopen('/var/lib/unbound/etc/unbound/unbound_control.pem','r')
11528:error:20074002:BIO routines:FILE_CTRL:system lib:bss_file.c:354:
11528:error:140AD002:SSL routines:SSL_CTX_use_certificate_file:system lib:ssl_rsa.c:470:

# grep control-enable /etc/unbound/unbound.conf
# control-enable: no
control-enable: yes

# unbound-control-setup
setup in directory /etc/unbound
generating unbound_server.key
Generating RSA private key, 1024 bit long modulus
..........++++++
.............................++++++
e is 65537 (0x10001)
generating unbound_control.key
Generating RSA private key, 1024 bit long modulus
...++++++
...............++++++
e is 65537 (0x10001)
create unbound_server.pem (self signed certificate)
create unbound_control.pem (signed client certificate)
Signature ok
subject=/CN=unbound-control
Getting CA Private Key
Setup success. Certificates created. Enable in unbound.conf file to use
#

# /etc/init.d/unbound restart
* Restarting recursive DNS server unbound [ OK ]

# lsof -i:953
COMMAND PID USER FD TYPE DEVICE SIZE NODE NAME
unbound 12018 unbound 5u IPv4 59685 TCP localhost:953 (LISTEN)

# unbound-control status
version: 1.2.1
verbosity: 1
threads: 1
modules: 2 [ validator iterator ]
uptime: 6 seconds
unbound (pid 12018) is running...
#

# unbound-control stats
thread0.num.queries=0
thread0.num.cachehits=0
thread0.num.cachemiss=0
thread0.num.recursivereplies=0

# unbound-control dump_cache | head -5
START_RRSET_CACHE
;rrset 86382 1 0 3 0
b.l.google.com. 86382 IN A 74.125.45.9
;rrset 86381 1 0 1 0
f.gtld-servers.net. 172781 IN A 192.35.51.30

大手IT 2009年 1-3月期 決算

大手ITの2009年 1-3月期の決算が発表されました。

# 為替レート 1ドル = 100円で計算

・グーグル
売上高: 55.09億ドル ( 5509億円 )
純利益: 14.23億ドル ( 1423億円 )
売上高純利益率: 25.8%

・マイクロソフト
売上高: 136.48億ドル( 1兆3648億円 )
純利益: 29.77億ドル ( 2977億円)
売上高純利益率: 21.8%

・アップル

売上高: 81.63億ドル ( 8163億円 )
純利益: 12.05億ドル ( 1205億円 )
売上高純利益率: 14.7%

・アマゾン

売上高: 48.89億ドル ( 4889億円 )
純利益: 1.77億ドル ( 177億円 )
売上高純利益率: 3.6%

・ヤフー

売上高: 15.80億ドル ( 1580億円 )
純利益: 1.18億ドル ( 118億円 )
売上高純利益率: 7.4%

グーグル、アップル、アマゾンは増収増益
MS、ヤフーは減収減益

アップルは iphone が貢献、グーグルは検索連動型広告が貢献。

MSは主要5部門のうち4部門が減収。(サーバ&ツール部門が7%増だったみたい)
OS部門が16%減益。PCの出荷台数が1割減少したのが影響したみたい。
不況だしなー。OSの乗り換えもあまり進んでないようだし。( XP -> Vista )

ネット広告: グーグル vs. ヤフー は、不況もあり、広告主企業が予算の絞込み、
費用対効果 ( 広告効果の精度 )の見直しの結果、広告効果が高いとされるグーグル
に集中したみたい。そのあおりがヤフーに。。
不況だと 3K 削減ってのもあるし。。( 交際費、広告費、交通費 )

それにしても、どこも売上高純利益率高いなー。
うーんすごい。もう市場が飽和状態なので、既存パイの奪い合いか。。。

Ubuntu 9.04 has been released

ついにGA版リリース!

早速インストールしたのでメモ。

Dell Inspiron 1526

すんなりインストール完了。
音が出ないなー。
Fedora 10 は音が出るんだけど。alsa の設定はまたの機会に。

バージョン確認方法

$ cat /etc/lsb-release 
DISTRIB_ID=Ubuntu
DISTRIB_RELEASE=9.04
DISTRIB_CODENAME=jaunty
DISTRIB_DESCRIPTION="Ubuntu 9.04"

ファイルシステムは ext4 にしてみた。

# mount | grep ext4 | grep -v grep
/dev/sda1 on / type ext4 (rw,relatime,errors=remount-ro)

root ユーザになる方法

root のパスワードは ユーザ xxxx のパスワード

$ sudo su -
[sudo] password for xxxx: 
root@alaska:~# 

rootユーザのパスワードを設定

root@alaska:~# passwd 
新しいUNIXパスワードを入力してください: 
新しいUNIX パスワードを再入力してください: 
passwd: パスワードは正しく更新されました
root@alaska:~# 

rootユーザからログアウト

root@alaska:~# exit
logout

su でログイン

hattori@alaska:~$ su -
パスワード: 
root@alaska:~# 

root ユーザで作業ができる。
Red Hat系で、rootでログインし操作しているので。。

sshd のインストール

Synaptic パッケージマネージャから open-sshserver をインストール


CLIからインストールする場合は、下記コマンドで。

# sudo apt-get install openssh-server openssh-client


# ps aux | grep sshd | grep -v grep
root      5737  0.0  0.0   5436  1104 ?        Ss   00:22   0:00 /usr/sbin/sshd

# lsof -i:22
COMMAND  PID USER   FD   TYPE DEVICE SIZE NODE NAME
sshd    5737 root    3u  IPv4  23584       TCP *:ssh (LISTEN)
sshd    5737 root    4u  IPv6  23586       TCP *:ssh (LISTEN)

$ ssh 127.1 -l root
root@127.1's password: 

Server Edition おもしろそうな機能あるなー。
クラウドって言葉が出ると、なんか興味がそそられる。
あとで Server Edition もインストールしてみよう。


Cloud

Interface compatibility with EC2 reduces the cost of learning a new interface when moving from a private to a public cloud. It enables users to adopt popular management tools for private cloud computing and to develop skills using the same techniques that they would deploy on Amazon's popular public cloud.
An extensive range of popular development services including an elastic block storage (EBS) equivalent and an S3 compatible storage manager eases integration.
Support for elastic IP assignment enables users to assign static public IPs to any virtual instance.
SOAP with WS-security ensures secure internal communication.
Support for instance control operations enables users to reboot virtual machines. This helps users troubleshoot more effectively.
KVM hypervisor provides users with best-of-breed virtualization technology

Linux KVM

KVM

host: Fedora 10
guest: Windows XP Pro

# uname -r
2.6.27.21-170.2.56.fc10.i686

# cat /proc/cpuinfo | grep 'model name' | uniq
model name : AMD Athlon(tm) 64 X2 Dual Core Processor 4800+

# modprobe -l | grep kvm
/lib/modules/2.6.27.21-170.2.56.fc10.i686/kernel/arch/x86/kvm/kvm-amd.ko
/lib/modules/2.6.27.21-170.2.56.fc10.i686/kernel/arch/x86/kvm/kvm.ko
/lib/modules/2.6.27.21-170.2.56.fc10.i686/kernel/arch/x86/kvm/kvm-intel.ko

# lsmod | grep kvm
kvm_amd 25740 0
kvm 115140 1 kvm_amd

仮想マネージャを起動。

新規VM作成。

あとは、CD-ROM ( WinXP Pro ) からインストールして終わり。
起動後の画面。音も聞こえる。 Hanoi Rocks :-)

VNC

server: Fedora10
client: windows xp

・server側の設定

接続できないときに切り分けが面倒なのでiptables をとめる 

# /etc/init.d/iptables stop

# yum install vnc-server.i386 -y

# vncserver

.vnc/xstartup を編集

# cat /root/.vnc/xstartup
#!/bin/sh

vncconfig -iconic &
# Uncomment the following two lines for normal desktop:
# unset SESSION_MANAGER
# exec /etc/X11/xinit/xinitrc

[ -x /etc/vnc/xstartup ] && exec /etc/vnc/xstartup
[ -r $HOME/.Xresources ] && xrdb $HOME/.Xresources
xsetroot -solid grey
xterm -geometry 80x24+10+10 -ls -title "$VNCDESKTOP Desktop" &
#twm & <- コメントアウト
exec gnome-session <- 追加

.xstartup を再読み込みさせるため、vncserver を再起動

# kill vncserverのPID

# vncserver

通常 vncserver は 5901 からポートを開く ( 5901 , 5902 , 5903 .. )

# egrep -i listen /root/.vnc/alaska.localdomain:1.log
vncext: Listening for VNC connections on port 5901

# fuser -n tcp 5901
5901/tcp: 3548

# ps aux | grep 3548 | grep -v grep
root 3548 0.4 0.6 23364 13300 pts/0 S 21:13 0:02 Xvnc :1 -desktop alaska.localdomain:1 (root) -auth /root/.Xauthority -geometry 1024x768 -depth 16 -rfbwait 30000 -rfbauth /root/.vnc/passwd -rfbport 5901 -pn

・Windows XP から Fedora 10 に接続

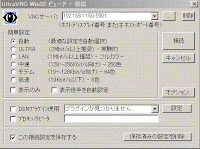
Ultra VNC ( free ) を日本語版を使用


IPアドレス::ポート番号 、という書式。


初めてvncserver を起動したときに設定したパスワードを入力し接続


# lsof -i:5901
COMMAND PID USER FD TYPE DEVICE SIZE/OFF NODE NAME
Xvnc 3548 root 6u IPv4 15308 0t0 TCP *:5901 (LISTEN)
Xvnc 3548 root 24u IPv4 17996 0t0 TCP 192.168.1.150:5901->192.168.1.2:gilatskysurfer (ESTABLISHED)

・iptables の設定

5900 , 5901 を許可する ( 必要におうじ 5902 , 5903 ... も )

# /etc/init.d/iptables start

システム -> 管理 -> ファイアウォール -> その他のポート